Online IPAC Manual
CONTENTS
- Infection Control Meeting
- Routine Infection Control Practices
- Additional Precautions
- Prevention of Injuries from Sharp Objects
- Exposure Management and Prevention of Transmission
- Water Quality
- Guidelines to Boil Water Advisory
- Guidelines for Patient Care
- New or Loaned Sterilization Equipment
- Recalls of Improperly Reprocessed Instruments
- Receiving Items From Our Dental Lab
- Cleaning Schedules
- Maintenance
- Steps of Instrument Reprocessing
- Infection Control Meeting
All policies and procedures for infection control shall be reviewed at least annually at a meeting.
Education / training will be updated appropriately.
Updates and changes will be made and reviewed as required.
The main issues to be covered are the following:
Environmental Routine Infection Control Practices
Instrument reprocessing
Occupational health and safety
All staff should be adequately immunized against the following diseases:
- Hepatitis B
- Measles
- Mumps
- Rubella
- Varicella
- Influenza
- Diphtheria
- Pertussis
- Tetanus
- Polio
It is the responsibility of each staff member to ensure their immunizations are up to date and recorded as such.
All staff working in the reprocessing area shall be offered Hepatitis B immunization unless there is a documented immunity to Hepatitis B.
2. Routine Infection Control Practices
Routine Practices is the term used to describe the standards you must use in the care of all patients all of the time.
Additional Precautions are added to Routine Practices to provide extra protection for certain infections once the means of transmission has been identified. These have also been known as “transmission-based precautions.”
All patients should receive verbal instruction regarding our specific infection control measures, when checking-in, before they enter the waiting area, to ensure compliance with the following:
Visitors should not enter the waiting room if they are sick or unable to comply with hand hygiene and other precautions that might be required.
Hand hygiene before and after visiting should be emphasized.
If PPE is required by the visitor, this should be accompanied by instruction in its correct application, use and disposal.
Instructional materials may be provided to visitors on recommended hand hygiene and respiratory etiquette practices.
Proper implementation of the above requires four steps for Routine Infection Control practices:
Risk Assessment + Hand Hygiene + Personal Protection Equipment
+
Control of the Environment
+
Administrative Controls
Risk Assessment:
This involves recognition of symptoms of infection,
This also involves an assessment of the risk of:
Contamination of the skin or clothing environmentally
Exposure to blood, body fluids, secretions, excretions, tissues
Exposure to non-intact skin or mucous membranes
Exposure to contaminated objects or surfaces
In cases where a patient may risk exposure of a microorganism to another patient, the following should occur:
Ask their permission to reschedule the appointment, at the time that their appointment is being confirmed.
Provide personal protection equipment for their use, and others, in the waiting room.
Insist on hand hygiene.
Try to seat them ASAP in a Clinic treatment chair, which happens to be at least 2m from any other patient.
Ensure that any objects or surfaces they have come into contact with are addressed (OPTIM) immediately and discretely.
Hand Hygiene:
It is more likely that staff will transmit infection to a patient than a patient will to another patient. Hand hygiene is considered to be the most important and effective measure to prevent the transmission of health-care associated infections.
Hand Washing: education will be provided to staff about how and when to wash their hands, and washing agents will be provided at all point-of-care locations.
Alcohol-based hand rubs (ABHR): ABHRs are the preferred method to routinely decontaminate hands in clinical situations when hands are not visibly soiled as they provide for a rapid kill of most transient microorganisms, are less time consuming than washing with soap and water and are easier on skin. The alcohol content must be 70% or greater.
Both Soap and ABHR must be present at every sink.
General hand presentation
No artificial nails.
Preferably no nail polish; it must be fresh and not chipped.
Nails are cut no longer than 2mm beyond fingertip.
Personal Protection Equipment
PPE should be put on just prior to the interaction with the patient. When the interaction for which the PPE was used has ended, PPE should be removed immediately and disposed of in the appropriate receptacle. The process of PPE removal requires strict adherence to a formal protocol to prevent recontamination.
Gloves: must be worn when it is anticipated that the hands will be in contact with contact with mucous membranes, non-intact skin, tissue, blood, body fluids, secretions, excretions, or equipment and environmental surfaces contaminated with the above.
Wear the correct size of gloves, ensure they are intact.
Gloves should be put on immediately before the activity for which they are indicated.
Clean and dry hands before putting on gloves.
Wear gloves for as little time as possible, to reduce irritations.
Gloves must be removed and discarded immediately after the procedure.
Hand hygiene must be performed immediately after glove removal.
Change or remove gloves if moving from a contaminated area to a clean area.
Change or remove gloves after touching a contaminated site and before touching a clean site or the environment.
Do not wash or reuse gloves.
The same pair of gloves must not be used for the care of more than one patient.
Do not handle anything other than the equipment or instruments required for the procedure while wearing gloves.
Masks: used by a health care provider to protect the mucous membranes of the nose and mouth when it is anticipated that a procedure or care activity is likely to generate splashes or sprays of blood, body fluids, secretions or excretions, or within 2m of a coughing patient, or within 2m of aerosol production.
A mask should be placed on a coughing patient, if tolerated, to limit dissemination of infectious respiratory secretions.
Mask should securely cover the nose and mouth.
Change mask if it becomes wet.
Do not touch mask while wearing it.
Remove mask correctly immediately after completion of task and discard into an appropriate waste receptacle.
Do not allow mask to hang or dangle around the neck.
Clean hands after removing the mask.
Do not reuse disposable masks.
Do not fold the mask or put it in a pocket for later use.
Eye Protection: used by a health care provider to protect the mucous membranes of the nose and mouth when it is anticipated that a procedure or care activity is likely to generate splashes or sprays of blood, body fluids, secretions or excretions, or within 2m of a coughing patient, or within 2m of aerosol production.
Eye protection should be used whenever there is a potential for splashes or sprays to the eyes.
Eye protection must be removed immediately after the procedure and discarded or placed in an appropriate receptacle for cleaning.
Prescription eye glasses are not acceptable as eye protection.
Control of the Environment: patient placement, cleaning, engineering controls
This includes measures that are built into the infrastructure of the health care setting that have been shown to reduce the risk of infection to staff and patients. This includes administrative controls, such as
Appropriate patient accommodation and placement
Equipment that is in good repair
Effective cleaning practices for equipment and the environment
Engineering controls are things such as dedicated hand washing sinks, point-of-care ABHR and sharps containers, and sufficient air changes per hour are the preferred controls as they do not depend on individual health care provider compliance. Physical barriers are also included.
3. Additional Precautions
For patients who may transmit infectious agents via the following:
1.Contact eg, Ab-resistant organisms, vomiting/diarrhea, uncontained drainage, conjunctivitis
Action: hand hygiene, gloves & gown, clean/disinfect all contact surfaces and equipment.
2.Droplet eg, pertussis, mumps, rubella, meningitis, acute respiratory inflection
Action: hand hygiene, surgical facemask and eye protection, clean/disinfect all surfaces and equipment.
3.Airborne eg, pulmonary TB, measles, chickenpox
Action: hand hygiene, N95 respirator if pulmonary TB is confirmed. Only staff immune to measles /chickenpox will provide care.
In case of a spill involving blood or bodily fluid:
Restrict the activity around the spill until the area has been cleaned and disinfected and is completely dry.
Put on PPE: gloves and facial protection (mask and eye protection or face shield).
Confine and contain the spill: wipe up any blood or body fluid spills immediately using either disposable towels or a product designed for this purpose.
Dispose of materials by placing them into regular waste receptacle, unless the soiled materials are so wet that blood can be squeezed out of them, in which case they shall be segregated into the biomedical waste container (i.e., yellow bag).
Disinfect the entire spill area with a hospital-grade disinfectant and allow it to stand for the amount of time recommended by the manufacturer.
Wipe up the area again using disposable towels and discard into regular waste.
Care should be taken to avoid splashing or generating aerosols during the cleanup.
Remove gloves and perform hand hygiene.
Administrative Control:
Policies and Procedures
Staff Education
Healthy Workplace Policies
Respiratory Etiquette
Monitoring of Compliance with Feedback
Staff education programs should address:
Disease transmission, the risks associated with infectious diseases and basic epidemiology of health care.
Associated infections specific to the care setting.
Hand hygiene, including the use of ABHRs and hand washing.
Principles and components of Routine Practices as well as Additional Precautions.
Assessment of the risk of exposure and the appropriate use and indications for PPE, including safe application, removal and disposal.
Appropriate cleaning and/or disinfection of health care equipment, supplies and surfaces or items in the health care environment.
Individual staff responsibility for keeping patients, themselves and coworkers safe.
Education in early problem or symptom recognition.
Patient education should include:
Correct hand hygiene.
Basic hygiene practices that prevent the spread of microorganisms, such as respiratory etiquette.
Not sharing personal items.
Respiratory Etiquette:
Health care settings should reinforce the personal practices that help prevent the spread of microorganisms that cause respiratory infections. These personal practices include:
Rescheduling an appointment when ill with an acute respiratory infection.
Avoidance measures that minimize contact with droplets when coughing / sneezing:
- Use of PPE.
- Turning the head away from others.
- Maintaining a 2m separation from others.
- Covering the nose and mouth with tissue.
- Immediate disposal of tissues into waste after use
- Immediate hand hygiene after disposal of tissues.
Healthy Workplace Policies:
Staff should not come into work when ill with symptoms that are of an infectious origin.
Staff who develop an infectious illness may be subject to some work restrictions.
Reporting:
If an outbreak of a reportable disease is suspected after seeing a cluster of patients with a given infection or symptom complex, report this to the local public health unit.
4. Prevention of Injuries from Sharp Objects
Exposures to blood-borne pathogens may occur through
percutaneous injuries (e.g. needle-sticks or cuts with sharp objects),
contact with the mucous membranes of the eyes, nose and mouth,
contact with non-intact skin (e.g. exposed skin that is abraded, chapped or has signs of dermatitis).
The majority of exposures are preventable by following routine practices:
- Personal protective equipment (PPE): gloves, protective eyewear, masks and protective clothing
- Safe work habits
- Proper handling, storage and disposal of sharps
Non-intact skin:
Should be covered with a water-proof bandage or protective dressing, which should be changed as needed.
Large cuts might require medical assessment and re-evaluation of work duties.
Percutaneous injuries pose the greatest risk of transmission of blood-borne pathogens. Best practices to prevent such injuries include the following:
- Always use extreme caution when passing sharps (explorers).
- Remove burs from handpieces immediately following the procedure.
- Identify and remove all sharps from trays before cleaning instruments: “pour” all trimmed wire segments into the sharps container, rather than trying to grab them with fingertips.
- Used sharps must be collected in a clearly labelled puncture-resistant container.
- When cleaning contaminated instruments by hand, heavy-duty utility gloves, appropriate clothing and long-handled brushes should be used.
Handling of Sharps:
During Pre-cleaning, identify and discard all sharps from tray: this includes whole / partial wires, braces, bands, appliances.
Discard sharps directly into the YELLOW sharps container: “pour” into the container, or use cotton forceps; do not use fingers. Cut used archwires in half or they may not go into the container easily.
Once the container has reached the designated capacity, the cap must be sealed.
Store the full container in the designated large cardboard box in the basement.
The box will be collected and removed from the office by the collection company.
5. Exposure Management and Prevention of Transmission
Blood-borne pathogens can be transmitted through occupational exposures to blood, saliva and other body fluids.
Significant exposures must be handled in a prompt and organized fashion.
All staff should know the dental office’s exposure management protocol and review it annually.
Significant exposures include percutaneous injuries with contaminated needles, burs or other sharp instruments, accidents in which blood, saliva or other body fluids are splashed onto non-intact skin or the mucosa of the eyes, nose or mouth.
In the event of a significant exposure, immediate first-aid measures should be instituted:
For percutaneous injuries:
- Allow the wound to bleed briefly and freely
- Gently wash the wound with soap and water
- Bandage as needed.
For exposures involving the eyes, nose or mouth:
- Flush the area with copious amounts of water.
For exposures involving non-intact skin:
- Wash the site with soap and water.
Following immediate first-aid, advise supervisor.
Take the following action:
- Review the source patient’s medical history, assessing the risk for blood-borne illnesses.
- If the patient’s HBV, HCV or HIV status is unknown, or if the patient presents with known risk factors, every reasonable effort should be made to obtain the patient’s informed consent to be tested for HBV, HCV and HIV. This can be accomplished by referring the patient to her/his family physician.
- Try to immediately transport to hospital for assessment of risk factors and any blood tests that are considered necessary.
- At the same time, the injured worker will be immediately transported to hospital for counseling, baseline blood tests and, if deemed necessary, post-exposure prophylaxis.
- The worker’s physician and / or an infectious disease specialist will be notified.
If necessary, post-exposure prophylaxis should be administered as soon as possible. For example, in the event of a high-risk exposure to HIV infection, anti-retroviral drugs should be administered within hours.
All cases involving a significant exposure should be documented, including:
- Name of the exposed worker and details regarding her/his vaccination status;
- Date and time of the exposure;
- Nature of the exposure, including the dental procedure being performed, the extent of the exposure and the immediate action taken;
- Name of the source patient and details regarding his or her known or suspected status related to blood-borne pathogens;
- Follow-up counseling and post-exposure management.
SUMMARY of ACTION:
Bleed, wash, bandage.
Inform supervisor.
Review history and attain consent for bloodwork.
Both parties go to the hospital.
Document everything.
6. Water Quality
Dental Waterlines
According to Crosstex (the manufacturer of DentaPure), no maintenance or monitoring protocols are required once the in-line cartridge is installed, for the life of the cartridge (1 year).
The Crosstex DentaPure cartridge must be replaced annually. This system meets all known microbiological water standards and recommendations.
There are no special disposal requirements for the DentaPure cartridge.
However, all staff members must receive training in should be trained regarding water quality, biofilm formation, water treatment methods, and appropriate maintenance protocols for water delivery systems.
If asked to do so, monitoring of dental water quality can be performed by using commercial self-contained test kits or commercial water-testing laboratories.
Clinical Waterline Maintenance:
Air/water, highspeed handpiece: must be purged 2-3mins at the beginning of each day (remove A/W tip or handpiece beforehand)
20-30s between patients (with the A/W tip or handpiece on)
Distilled water used in Sterilization
The Durastill Model 46C Water Distiller will provide the water used in sterilizers. It will require periodic maintenance, as per its manufacturers instructions.
The limiting values of water contaminants are the following:
pH: 6.5 – 8.0
Evaporation residue: <15mg/L
Conductivity: <50us/cm
Hardness: <0.1mmol/L
Cadmium: <0.005mg/L
Chloride: <3mg/L
Iron: <0.2mg/L
Lead: <0.05mg.L
Phosphate: <5mg/L
Silica: <2mg/L
Other heavy metals: <0.1mg/L
7. Guidelines to Boil Water Advisory
In times when there is a loss of potable water, or a boil water advisory, or other situations when the public water supply becomes compromised, our Durastil informs us that the water produced by the distiller is safe for consumption and clinical use.
Guidelines for Boil Water Advisory
In times when there is a loss of potable water, or a boil water advisory, or other situations when the public water supply becomes compromised, seek information from Public Health or the Municipal office.
We will keep 8gal of “emergency” distilled water in jugs principally for use in reprocessing. Replaced as needed.
We will keep one case of “emergency” bottled water for patient use and consumption. Replaced as needed.
When a boil water advisory (BWA) is issued, do not drink or use tap water for the following:
Brushing teeth
Gargle
Rinse appliances
Dental treatments
The following actions are to be taken:
Commercially bottled water or distilled water from our distiller can be used instead of tap water.
Perform handwashing using distilled water from the distiller, or use the 6 gallons of “emergency” water.
Ensure hand hygiene poster is in the patient washroom, provide distilled water for handwashing.
Post DO NOT DRINK signs at all water taps and sinks. Shut off the water to the faucets.
8. Guidelines for Patient Care
Before treatment:
Explain to all patients the impact of the boil water advisory on dental care and indicate what procedures we are following.
Warn patients before treatment that they are at greater risk for water-borne illnesses if they are immunocompromised and allow them to reschedule appointments if desired.
Reschedule appointments for known immunocompromised patients, such as HIV-positive individuals, chemotherapy and transplant patients, and congenitally immunocompromised individuals.
Reinforce that patients use only boiled or commercially bottled water for tooth-brushing or other dental care in their own homes if they are under a boil water advisory as well.
During dental procedures:
Use only “emergency” water for patients to drink and rinse.
Use an irrigator bulb of “emergency” water in place of the air/water syringe for rinsing during bonding procedures.
When the boil water advisory is rescinded:
Flush any water-using fixture or piece of equipment in accordance with the MIFU specifications.
Run water faucets on full for at least one minute before using the water.
Other:
Exclude all employees with diarrheal illness from work following standard rules of exclusion a la OHSA.
9. New or Loaned Sterilization Equipment
Newly purchased non-sterile Semi-critical equipment must first be inspected and reprocessed according to their intended use.
New Sterilization Equipment (Ultrasonics, Chambers, Handpiece lubricators, Statims)
Ensure from the seller that the equipment meets established reprocessing parameters.
New sterilizers must pass at least 3 consecutive cycles with appropriate challenges placed in an empty sterilizer, as well as at least one cycle challenged with a full test load, before being put into routine service.
The manufacturer’s information for all equipment must be received and maintained in a format that allows for easy access.
Loaned Sterilization Equipment (Ultrasonics, Chambers, Handpiece lubricators, Statims)
A facility shall not use any equipment that does not arrive in sufficient time to allow for its inventory, inspection and reprocessing.
Ask if there is a history of any problems with the loaned equipment. Ensure its performance meets established reprocessing parameters.
Request copies of the manufacturer’s information for all equipment. Receive and maintain it in a format that allows for easy access. Keep the copies if possible, else return as requested.
Once the loaned sterilization equipment has been received:
It must be disassembled, cleaned and reprocessed before use. (Ask the service tech if this has been done.)
Ideally, received 24h prior to intended use.
Must be tracked and logged in the Sterilization Logbook: ID number and owner of the device.
Cleaned and reprocessed before being returned to the owner. (Ask if the service tech will do this.)
New Semi-Critical Instruments
For all new Semi-critical instruments, the following must occur:
Visual inspection. Check for defects, ensure the instrument works as intended (ie, that pliers are not seized-up, ligature snip edges are not cracked, etc). Return to manufacturer if unacceptable.
Disassemble if there is at least one removable part. Open pliers, etc.
Place in Used instrument container for non-sterile transport.
Enter into sterilization steps as is done with each used instrument.
Store as outlined until it is to be used.
Single-Use instruments
If equipment or devices cannot be cleaned and reprocessed according to the recommended standards, they are not purchased, or they shall be designated as single-use.
Semi-critical instruments labelled as single-use must not be reprocessed and reused unless the reprocessing is done by a licensed reprocessor (there are none in Canada). They must be discarded after use.
Recalls of Equipment
In case of equipment alerts and / or recalls from manufacturers or government, inform your supervisor immediately. The equipment in question shall be removed from use and:
Cleaned and reprocessed, if it can be done safely.
Returned to the manufacturer for repair, if required.
Discarded appropriately, if required.
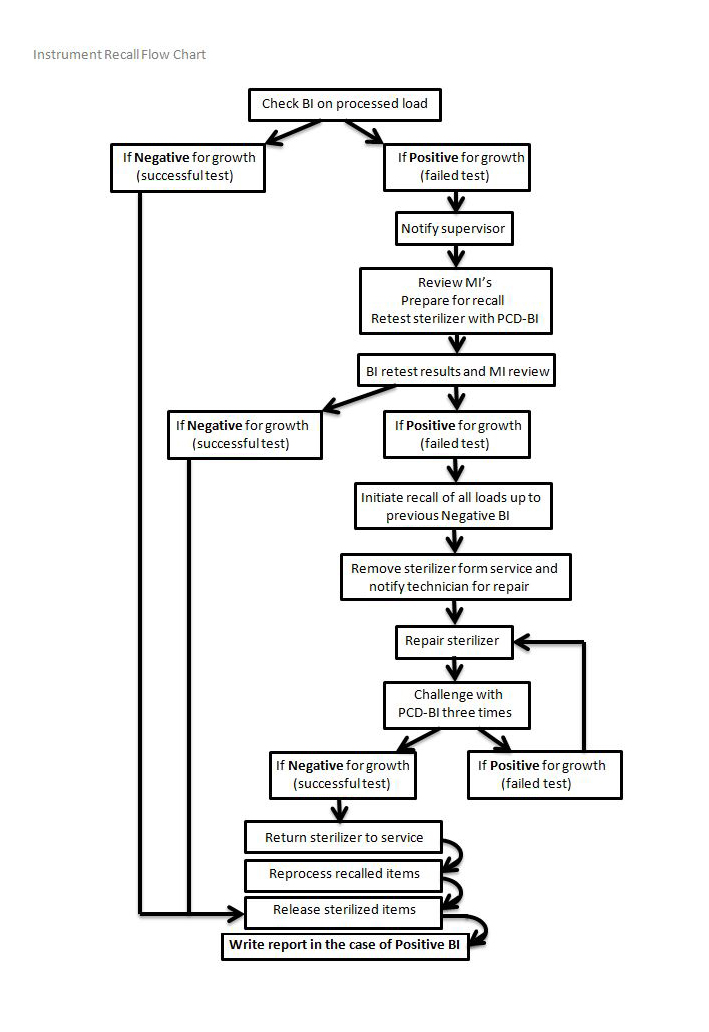
10. Recalls of Improperly Reprocessed Equipment
In the case of a failed BI / CI indicating a faulty sterilizer:
Refer to the flow chart on the following page.
Identify faulty sterilizer and remove from use. Chart error code, if able. Notify your supervisor immediately. Contact tech for maintenance / repair.
Make appropriate notes in Sterilization Logbook.
Remove cassette / equipment from use, reprocess as required. This step can occur at point-of-use, after unwrapping, during visual inspection.
The sterilizer shall be removed from service and shall be challenged by a spore test.
The sterilizer can be returned to service if it passes 3 consecutive spore tests, without errors.
Patients shall be notified and advised on what to do, if the risk assessment indicates doing so.
Other facilities and / or regulatory bodies shall be notified, if the risk assessment indicates doing so.
11. Receiving Appliances from our Dental Lab
All items returned from an outside laboratory to a dental office are cleaned and disinfected prior to placing in a patient’s/client’s mouth.
Inquire and ensure the lab astutely does the following with each appliance:
Cleans each appliance when it’s finished production
Places it in a baggie with an appropriate disinfectant (Coecide)
Seals each baggie for transport
Each appliance we receive is already cleaned and disinfected.
12. Cleaning Schedules
Clinic
Daily start-up:
Water (A/W) Lines: purge for 2-3mins (remove tip first)
Suction Lines: flush with water (above) or Vac Attack solution
Dust as required: preferably with OPTIM wipe
Between patients:
Chairs: OPTIM, replace barriers
Hoses: OPTIM wipe
Sink: OPTIM wipe
Work surfaces: OPTIM wipe
Light handles: replace barrier, if used
Reusable containers of dental materials: OPTIM / alcohol
Curing lights: OPTIM / alcohol, replace barrier
Suction Lines: flush with 2c water
Handpiece: purge for 20-30s
Water (A/W) syringe: purge for 20-30s
End of day:
Chairs: OPTIM wipe
Sinks: OPTIM wipe
Work surfaces: OPTIM wipe
Benches: OPTIM wipe
PC workstations: OPTIM wipe
Floors: sweep and wet-vac
As required:
Spills: check MSDS as required
Body fluid spills: immediate action, follow protocol in office manual
Benches: OPTIM wipe
Floor: Marks / dust / dirt
Weekly:
Alcohol dispensers: top-up
Suction lines: flush with Vac Attack solution
Dust top and screen of monitors, keyboards, mouse
Dust underside of chairs and control buttons
Dust cobwebs in corners
Monthly:
Walls: water-detergent solution
Yearly:
Change DentalPure cartridges (September).
Administration and Waiting Room
Daily start-up:
Tiles: Sweep and / or mop as required
Carpets: Vacuum if necessary
Books/magazines/toys: Organize, tidy-up
As required:
Chairs: OPTIM wipe as indicated
Toys: OPTIM wipe between uses
ABHR: Immediately replace empty dispensers, do not top up
Soap in washroom: Immediately replace empty dispensers, do not top up
Masks: Immediately replace empty box
Tissues: Immediately replace empty box
Toothpaste: Provide single-use tube when requested
Touch surfaces: OPTIM wipe at least daily
Floors: Cleaned at least daily
End of Day:
Tiles: Sweep and / or mop as required
Carpets: Vacuum if necessary
Toys: OPTIM wipe
Waiting room chairs: OPTIM wipe
Waiting room tables: OPTIM wipe
Touch surfaces: OPTIM wipe
Granite countertop: Wipe with indicated cleaner
Washroom: OPTIM wipe all hard surfaces (window sill, doorknob, sink & faucet, handrails, toilet seat, toilet bowl); glass cleaner for mirror
Weekly:
General dusting: Window sills, etc.
Monthly:
Dust waiting room tree
Instrument Reprocessing Area
Daily:
Clean and disinfect (OPTIM wipe):
Countertops, backsplash
Work areas
Sinks
Equipment surfaces
Shelves
Sweep and Wet-vacuum floors as needed and at end-of-day
Every 3 months:
Clean and disinfect (OPTIM wipe):
Cabinets and drawer pulls
Plastic veil over tools
Shelves in sterile storage area in Clinic
Every 6 months: end June, end December
Clean and disinfect (OPTIM wipe):
Walls
Light fixtures
Other fixtures
Every hard surface that can be wiped
13. Maintenance Schedules
Twice annually, our tech will perform scheduled maintenance / cleaning of each piece of sterilization equipment, in addition to the manufacturer’s instructions. One of these visits should coincide with the annual HARP test for x-ray equipment.
The visit will be logged in the Sterilization Logbook:
Date
Tech name
All machines in working order
Equipment identified as requiring maintenance will be removed from service and addressed immediately.
14. The 6 Steps of Instrument Reprocessing
Step 1 of 6
Pre-Cleaning and Point-of-use Sanitization
At point-of-use or immediately prior to placement of reusable instrument / cassette into transportation container, Pre-clean as follows:
Semi-Critical items:
a. Blood: moisten gauze with surfactant / water+detergent and wipe until blood is visibly removed and instrument(s) are visibly clean.
b. Debris: moisten gauze with alcohol and wipe until debris is visibly removed and instrument is visibly clean.
c. Composite/Cement: remove with a dedicated metal instrument (wipe instrument with alcohol afterwards).
Disassemble all reusable instruments with at least one removable part, place back into cassette and close for Cleaning.
Place pre-cleaned reusable instrument / cassette into “Used” container for non-sterile transport. Snap the lids closed when transporting.
Discard all single use items.
Discard any sharps into a YELLOW puncture-resistant, leak-proof container that is specifically designed for their management and labelled with the universal Biohazard symbol (this includes wires, brackets, bands, appliances, etchant tips, flowable composite syringe tips, used/retired hand instruments).
Non-Critical items:
Non-critical items should be cleaned after use or, if contaminated, cleaned and then disinfected with an appropriate disinfectant;
OPTIM spray or OPTIM wipe or 60 to 95% alcohols
Environmental:
After each patient, disinfect chair surfaces (including armrests) with OPTIM. Heavily soiled areas require cleaning prior to disinfection.
After each patient, disinfect all working surfaces and patient contact surfaces (sink, countertop) and any reusable container of dental material with OPTIM.
After each patient, change all barriers.
Suction lines should be purged between patients by aspirating water or an appropriate enzymatic cleaning solution.
At least once per week, suction lines should be flushed out with an enzymatic cleaner or appropriate cleaning solution.
Impressions:
Sanitize with OPTIM spray. Allow to sit the required time as indicated by the manufacturer, do not rinse.
If Cleaning (Step 2 of 5) cannot be performed immediately, instruments should be placed in a puncture-resistant holding container and soaked with a water-detergent solution or an enzymatic cleaner to prevent drying of organic material, and make subsequent cleaning easier and less time-consuming. Liquid chemical sterilants or high-level disinfectants should NOT be used as holding solution.
Step 2 of 6
Cleaning
The following are prohibited in the Reprocessing area:
- eating / drinking
- storage of food
- application of cosmetics, including lip balm
- handling of contact lenses
Appropriate personal protective equipment (PPE) shall be worn for all reprocessing duties and discarded when appropriate:
- Gloves: to be changed or removed before handling sterilized instruments.
- Masks.
- Eye protection.
- Gown +/- Apron or other appropriate clinical uniform.
Receiving: Receive all instruments to be processed in a puncture-proof container in the specified area within the instrument processing area.
Cleaning:
Cassettes and loose hand instruments:
Ultrasonic cleaning:
Completely immerse the instruments in the appropriate basket.
Allow the cycle to run completely, according to the manufacturer’s instructions.
Thoroughly rinse.
Allow to dry prior to Step 3.
Handpieces:
Place in automated handpiece processor and allow the complete cycle to elapse.
Wipe off excess lubricant with gauze or paper towel +/- alcohol.
Place in sterilization pouch.
Sterilize in Wrapped cycle, do not remove until cycle is complete and pouch is dry.
NOLAs, lip retractors, scanner tips:
Thoroughly clean with warm soapy water, rinse and remove excess rinse water.
Flush out lumens using irrigator with cleaning solution, rinse with water, expel excess fluids with air.
Blot dry with paper towel or allow to dry before placing in sterilization pouch.
Sterilize in Chamber Special/Plastic cycle, do not remove until cycle is complete and pouch is dry.
A brush used for cleaning must be single-use and discarded after use, or placed in OPTIM soak for disinfection between uses. It must be inspected regularly and discarded if worn.
Failed sterilization cycle:
This can occur if:
- The BI is positive.
- The CI has not changed colour.
- The data logging indicates a failed parameter (temp, pressure, exposure time).
- An incorrect reprocessing method was used.
The following must occur:
Identify faulty sterilizer and remove from use. Chart error code, if able. Notify supervisor. Contact tech for maintenance / repair.
Make appropriate notes in Sterilization Logbook.
Remove cassette / equipment from use, reprocess as required. This step can occur at point-of-use, after unwrapping, during visual inspection.
The sterilizer shall be removed from service and shall be challenged by a spore test.
The sterilizer can be returned to service if it passes 3 consecutive spore tests, without errors.
Patients shall be notified and advised on what to do, if the risk assessment indicates doing so.
Other facilities and / or regulatory bodies shall be notified, if the risk assessment indicates doing so.
Step 3 of 6
Post Cleaning and Wrapping
Prior to terminal sterilization:
Visually inspect all instruments once Cleaning is complete.
Repeat Cleaning for any instrument that is not clean.
Do not reassemble mirror handles.
Lubricate any instrument requiring lubrication, according to the manufacturer’s instructions.
For loose instruments:
Place in appropriate sterilization pouch; refer to the pouch MIFU regarding number of instruments.
The pouch must have a Class I and Class IV CI.
For cassettes:
Place mirror head in clip mounted within cassette, do not reassemble mirrors.
Place a Class IV CI strip within the cassette before closing.
Wrap all kits with blue paper and Class I CI tape.
Label each item with Date, Sterilizer Unit (eg. A,B,C), Load number (eg. 1-6), Name/Initials of person responsible for the load.
Step 4 of 6
Sterilization and Quality Control
All instruments must be placed in a pouch or within a wrapped cassette.
All instruments must be sterilized and are not removed before the full cycle has elapsed, including drying.
Pouches with plastics are sterilized via the Chamber Plastics/Special cycle.
Pouches with all other instruments are sterilized via the Chamber Wrapped cycle.
Wrapped cassettes are sterilized in the Chamber Wrapped cycle.
For each load, the following CI’s must be used:
Class I: on the outside of the packaging
Indicator tape, or built-in to the pouch
Class IV or V: on the inside of the packaging
Indicator strip, placed within the cassette before wrapping
Built-in to the pouch
Class V Integrator:
Placed within a PCD used in each load
Quality Control
Data Logging:
The sterilization process shall be validated and documented, tested, monitored with results recorded and audited as follows:
Written record at the completion of each cycle, indicating:
- Date
- Time in
- Temperature reached
- Pressure reached
- Duration of sterilization
- Time out
- Contents (spore, cassettes, pouched instruments, pouched plastics)
- Chemical Indicator results
- Errors
- Name/Initials of person responsible for the load
These records will be kept for 10 years.
Visual Inspection:
When removing the instruments from the sterilizer, check the following:
Package integrity: no rips or tears.
Dryness: no wet spots.
Intact seals.
Reprocess any failures.
Ensure the presence of a label fon each successful item with Date, Sterilizer Unit (eg. A,B,C), Load number (eg. 1-6), Name/Initials of person responsible for the load. Place immediately into transportation container (see Part 5) or storage.
Biological Indicators: Spore test
A BI shall be used to test the sterilizer each day and for each type of cycle that it is used.
Results are to be recorded in the Sterilization Logbook.
If the spore test fails, remove the machine from use and retest. If it fails again, contact the manufacturer.
Step 5 of 6
Transportation of Sterilized Instruments
Transportation occurs in a dedicated container:
It is labeled “Sterile” and is only used to transport sterilized instruments directly to their place of storage. Nothing else is carried with or within it.
It is dry before any sterile pouch or wrapped cassette is placed within it.
It is puncture resistant and has lids which snap closed.
It is moisture-proof and cleanable.
It is returned empty to its specified location in the reprocessing area and is stored with the lids closed.
It is cleaned at least once a day with OPTIM wipe.
It must not cross from the Sterile to the Dirty side of the reprocessing area.
Ensure the presence of a label on each sterilized item with Date, Sterilizer Unit (A,B,C), Load number (1-6), Name/Initials, then in the container immediately.
Close the lid.
Transport sterilized items directly to their place of storage within the Clinic.
Transportation is done in a manner which avoids damage to the item / pouch.
Step 6 of 6
Storage and Use
Storage:
Storage of sterilized items should be located in a separate, enclosed, limited-access area relative to the processing area.
Adequate space to prevent damage to pouches.
Temperature between 18C-23C and relative humidity between 30%-60%.
Storage area should be clean, dry and dust-free, inaccessible to unauthorized persons.
Shelves must be solid top and bottom, at least 25cm from the floor.
Stock should be rotated, such that the oldest item is used first.
Sterility must be maintained until the item is used.
Item should be handled in a way which prevents recontamination.
Use:
Do not open a pouch or cassette until they’re ready to be used, at the point-of-use.
Do not use any item that does not have a label.
At point-of-use, when opening the pouch or cassette, perform the following checks:
Validate the results of the Class IV internal monitor, record in patient chart.
Visually inspect the item for discolouration or soil (remove from use and reprocess).
Check for defects (remove from use and seek repair or sterile replacement).
Check for dampness (remove from use and reprocess).
Reassemble mirrors as required.