Instructions for Pre-Sterilization labeling with SteriReader
Labels applied to items before sterilization must be able to tolerate sterilization while remaining firmly affixed and must be legible afterward. The most reliable and cost-effective labels seem to be available at OnlineLabels.com (item OL5425LP) and can be used with any laser printer rather than a specialized printer.
This may seem strange to some, however, there are several reasons behind it. One: everyone has a laser printer; there is no need to purchase specialized, expensive equipment for this purpose. Thermal print labels, like a Dymo, produce labels that will turn black in an autoclave cycle, so they cannot be used. Inkjet label printers cost at least $1000. Two: other means of producing labels that can be autoclaved involve tremendous waste. Think of those labels as having the text “ironed on” from a plasticized ink roll to a label roll. With this type of thermal transfer printing, only a fraction of the ink roll is used, plus they expensive and a nuisance to change. You really don’t get your money’s worth from it and they are marked-up tremendously high by suppliers. Three: these label sheets are approximately half the cost of Dymo labels. However, this method is most convenient if there is a laser printer in your steri area, or at least very close by.
Steps:
Part I: Calibration: You may only need to do this once.
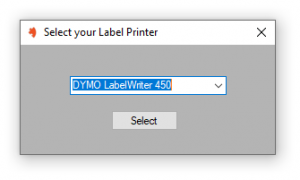
- Under Settings | Printers | Select Label Printer, select a laser printer on your office network. (Specifically, select a printer that is not a Dymo.)
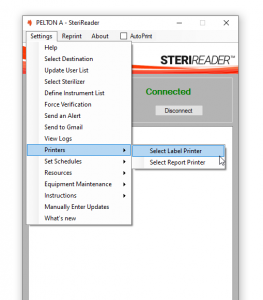
- Make your selection then click Select. Your selection will be saved but the window will close. Click on Settings | Printers | Select Label Printer once again.
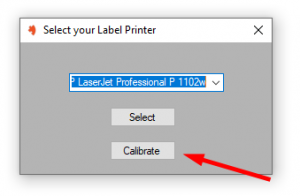
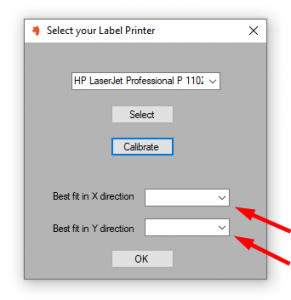
- After making your selection, the window will expand to the image below. You will need to calibrate your laser printer to print properly aligned labels. Click Calibrate to print a test page with 8 test labels.
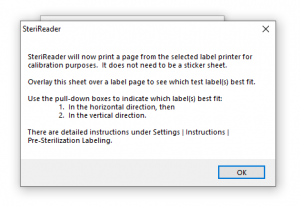
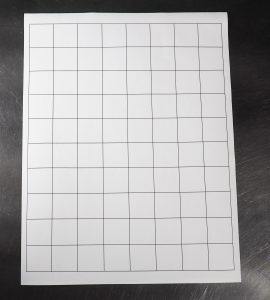
- A message below will show. Place a blank sticker sheet or the OL5425LP label template (available here, scroll down) in your printer, then hit OK.
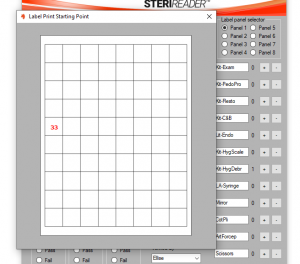
- Aside: the image below shows a blank template for OL5425LP sticker sheets. The second image shows the test labels printed on the template. You can see that the label of best fit in the X (horizontal) direction is Label-4, while the label of best fit in the Y (vertical) direction is Label-5.
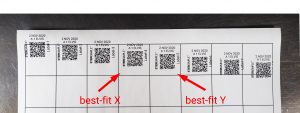
- Once the test labels are printed, the window will expand to show the image below. Look at your test page and determine which label fits best in the X (horizontal) direction and which fits best in the Y (vertical) direction. For example, the picture above has Label-4 best-fit in X and Label-5 best-fit in Y. Use the pull-down boxes to select Label-4 in the X direction and Label-5 in the Y direction, for this example. Every printer is different. Click OK to save. Calibration is now complete.
Part II: Printing: This is the normal workflow.
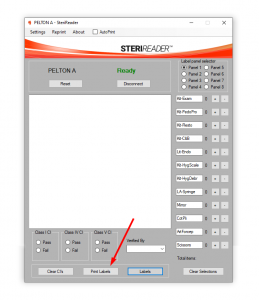
- At the SteriReader interface, click on Labels to expand the interface and select the labels for the items to be sterilized. Hit Print labels at the bottom of the interface.
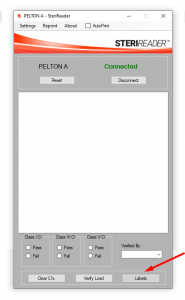
- This screen will show, which is an image representing the label sheet. A red number in one square may be present. This number, called the index, indicates the place on the sheet where this group of labels should start printing. The software will remember where the last group ended, so that the remainder of the sheet can be used without waste. Click on the square where this group of labels should start printing. The direction of printing is left to right, row by row top to bottom.
- A message will pop up, indicating how many label sheets to place in the printer, depending on how many labels you need for your print job.
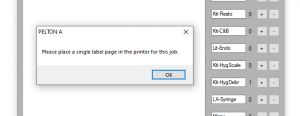
- Place the required number of sheets in the printer then click OK on the above message. The label sheet(s) will print.
- Affix the labels onto the corresponding items and begin your sterilization cycle.
The list of labels will be saved as the Contents List associated with the cycle.
If you forget to label prior to sterilization, you will be prompted to do so at the end of the cycle as you verify.
In case a label curls after sterilization, go to the Reprint function (at the main menu bar on the interface) and double-click on the item(s) to print the sticker. You will be guided through the index / start position selection as above.