Instructions for using GHS Label Maker through SteriReader
SteriReader has a GHS Label Maker function built into it.
Every product in your office should have an SDS doc and each product with an SDS doc must have a GHS label on it. These “Globally Harmonized System” labels have basic info such as how hazardous they are, what PPE to wear and what to do in case of exposure.
These labels are formatted to be printed on Avery Presta 94236 label sheets, on any inkjet or laser printer. You can also print them on any full-sheet sticker, although you will need to cut them out, which isn’t so bad.
Steps:
Part I: Calibration: You may only have to do this once, when you use the GHS Label Maker for the first time.
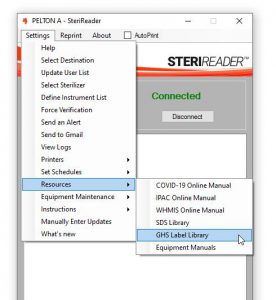
- Go to Settings | Resources | GHS Label Library. This will open the GHS Label Maker function.
- Under Settings | Printers, select a laser printer on your office network.
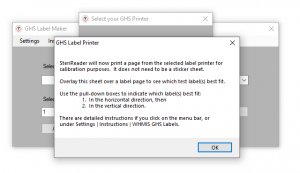
- After making your selection, click Select. This will save your selection but will also close the window. To go Settings | Printers once again. You will need to calibrate your laser printer to print properly aligned labels. Place a blank sticker sheet in your printer, then click Calibrate to print a test page with 8 test labels. A message will show. Place a black sticker sheet or a printed Avery Presta 94236 template into your selected printer. (You can find the template here) Click OK to print the test page.

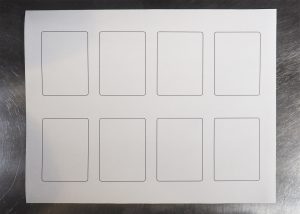
- Aside: the picture below is a picture of the Avery Presta 94236 template which I’ve downloaded from the Avery website. Below that is the test page printer onto that template. Identify which label fits best in the X (horizontal) direction, and which label fits best in the Y (vertical) direction. In this case, Label-7 fits best in X, while Label-4 fits best in Y. All others are outside the boxes. Every printer is different, so your particular calibration may have different labels which fit best.
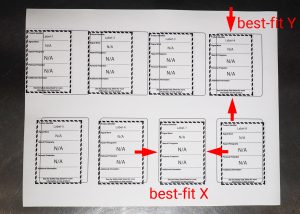 Once the test page has printed, the window will expand to show the screen below. Look at your test page and determine which label fits best in the X (horizontal) direction and which fits best in the Y (vertical) direction. For example, the picture below has Label-7 best-fit in X and Label-4 best-fit in Y. Use the pull-down boxes to select Label-7 in the X direction and Label-4 in the Y direction. Click OK to save. Calibration is now complete.
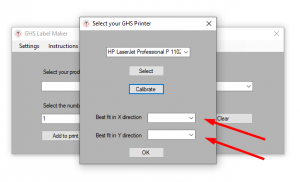
Part II: Printing: This is the regular workflow.
- Go to Settings | Resources | GHS Label Library.
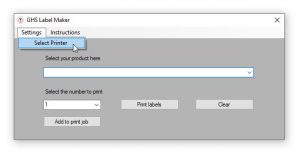
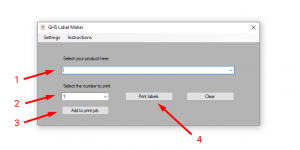
- Select the product from the pull-down box (1). Then select the number of labels you require for this product (2). Then, click the Add to print job button (3).
- Repeat for all items you require labels for. One print job can produce a maximum of 80 labels. You can start over by clicking on the Clear button.
- When you have finished your selections, click the Print labels button (4).
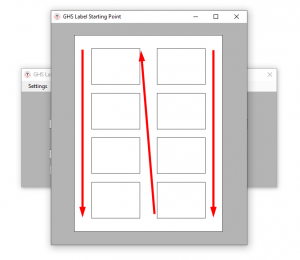
- An image representing the sticker sheet will pop up, showing 8 rectangles representing each label. The red arrows in the image show the direction of printing. Click on the rectangle where the print job should start (a number will appear in the box, which is the index). The direction of print is down the right column, then down the left column. (Imagine if you were to turn this sheet 90 degrees onto its side, the direction of print would be “normal.”)
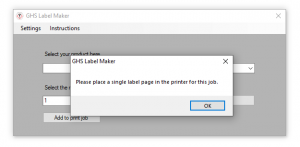
- A message will pop up, indicating the number of sheets you require for your print job. Place the appropriate number of sticker sheets in your printer, then click OK on the message. Your labels will print.
- Affix the labels to your items.
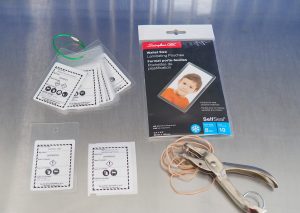
For some items, consider placing a label in a self-sealing laminate pouch, then use an elastic band to make a reusable tag, or group them together with a keyring. These laminate pouches are available at Staples (item 193218). They can be placed on Enzyme gallon containers, OPTIM wipe containers, hand sanitizer, etc. Group them on a keyring for items such as composites and adhesives, placed where these products are stored for easy reference.