Your TransLogger will record cycle logs from your autoclave to a micro SD (uSD) card as it communicated over WiFi with SteriReader.
**This manual will review TransLogger operation as it works with SteriReader. **
**It will not work unless the uSD is inserted.**
Contents.
1. Connection to your autoclave.
2. Start-up.
3. Recording cycle data.
4. Drag n Drop.
5. Resetting your TransLogger.
6. Configuring the uSD.
1. Connection to your autoclave.
Your TransLogger will come with a cable which is specific to your particular autoclave.
Some autoclaves may need their settings changed, to enable recording.
Click on one of the brand names below to see a how-to video about connecting your TransLogger to your autoclave and changing settings, if required.
Midmark M9 / M11
Midmark M3
Statim 2000 / 5000 (older models)
Statim 2000 / 5000 G4
Bravo
Flight
Tuttnauer Elara / EZ+
Tuttnauer 10k (older model)
Miele
StatClave G4
Pelton & Crane
Lisa
2. Start-up.
Connecting your TransLogger with its cable will start it up.
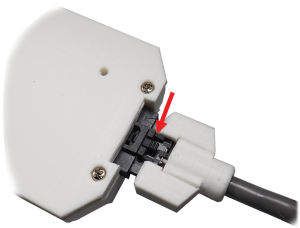
The large white end clips into the back of your TransLogger and will lock in place. You can remove this end of the cable by pushing up on the locking tab, from the bottom.
Affix the cradle to your autoclave with foam mounting tape and slide your TransLogger into place. For Midmark autoclaves, place the cradle well away from the steam that is released as the door opens.
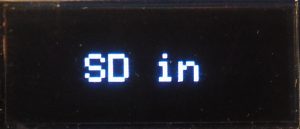
Once connected and/or powered-up, your TransLogger will beep 2x and “Steri Simple” will flash on its screen. Your TransLogger will then indicate that the uSD card is (”SD in”) and it has the proper configuration files (”SD OK”).
The screen will then say “Connecting to WiFi” and your TransLogger will beep 2x every 5s as it attempts connection.
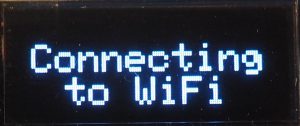
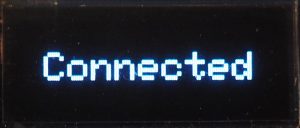
It will beep happily when connected and flash its IP address. It is ready to go.
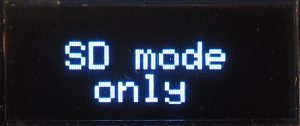
It will attempt to connect 5 times. If they all fail, it will enter “SD only” mode and can still record cycles, but only to its SD – it will not transmit to SteriReader.
Once it enters SD-only mode, it will again try to connect another 5 times.
If it fails again, it will operate in SD only mode, but will try to connect to SteriReader at the end of a cycle.
It will continue to attempt connection every 2 minutes until successful. Your TransLogger can still record to SD if your WiFi is down.
** It is excellent practice to disconnect your TransLogger from power at the end of the week. **
3. Recording cycle data.
Your TransLogger will automatically record cycle data to a file on the uSD card as a cycle starts.
When a new cycle starts, your TransLogger will quickly beep 3x. This is its characteristic “start beep.”
If your TransLogger is operating in SD-only mode, it will beep 3x in a warning tone, indicating that it is not transmitting but still recording the cycle.
The cycle number will be displayed on the TransLogger screen.
There is a white indicator light on the top of the TransLogger that will gently flash as data is received and written to the file.
At the end of a cycle, your TransLogger will again quickly beep 3x. This is its characteristic “end beep.”
The cycle number will remain on the screen until the next cycle begins.
Cycle log files are stored on the uSD card as consecutively numbered text files (eg, 01.txt, 02.txt).
If a cycle has clearly ended but the white light says lit, you will need to reset your TransLogger by un- and re-plugging its cable, before you start the next cycle.
4. Drag n Drop.
If WiFi is down, you can still record your cycles to the uSD card. Use Emergency Labels to produce your labels, and use Drag n Drop to enter the recorded cycle logs from your uSD into SteriReader.
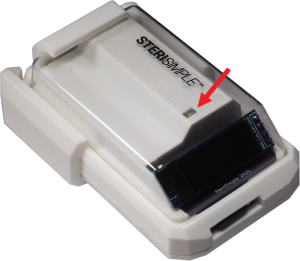
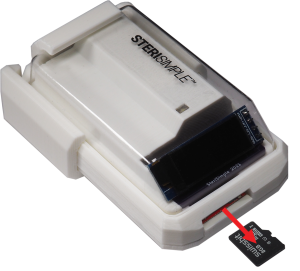
Gently remove the uSD card from your TransLogger by pushing in with your fingernail until it clicks to release. Then, place it in the SD adapter provided and insert that into your PC.

While the sSD card is out (or improperly inserted), the screen will flash every 5s:
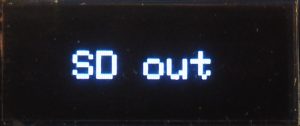
**Your TransLogger will NOT OPERATE while the uSD card is out.**
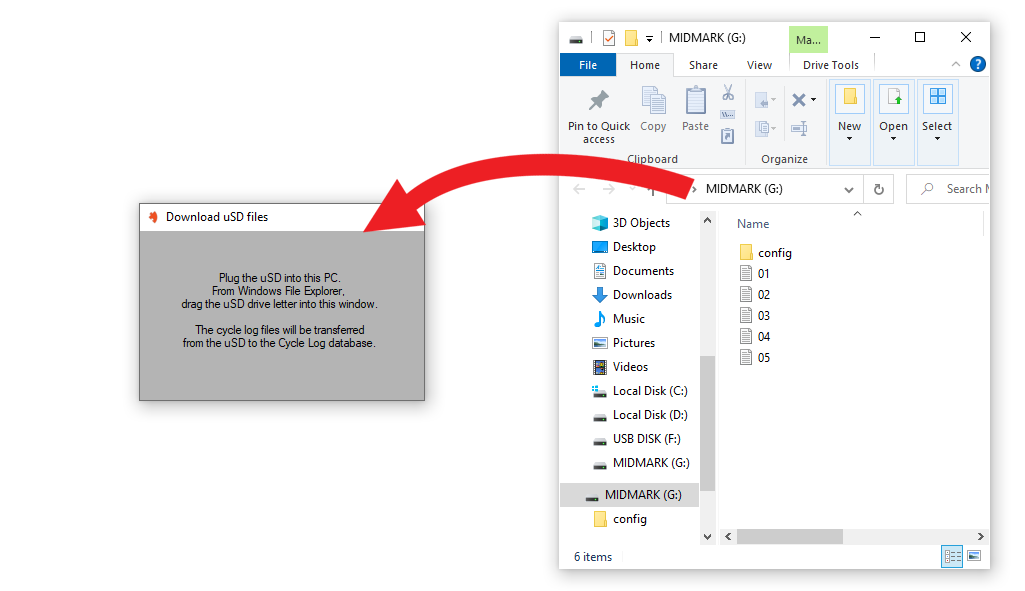
Through Windows File Explorer, drag the file one at a time into the SteriReader interface. The most recent file has the largest number as its file name.
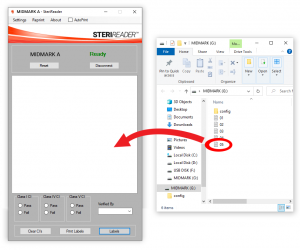
The cycle log will appear and you can verify the load as you normally would. If you’ve already produced labels, that contents list will be added to this cycle log.

You can download the conents of the uSD card by going to Settings | Micro SD | Download Files.
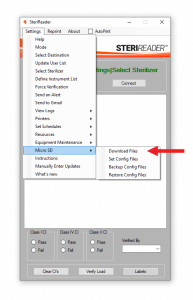
Whenever you do this, SteriReader will automatically:
a) back-up all the files on the card to a date-stamped folder in your save destination,
b) search each file for the sterilization date, name and save each file,
c) clear the uSD card when complete.
Never attempt to manually move recorded cycle logs from the uSD into a folder on your PC and never ever remove the config folder from the uSD. Your TransLogger simply will not work any longer.
When download is complete, replace the uSD card into your TransLogger. It will beep its happy beep, the screen will indicate SD OK and the IP address will flash.
** BE CAREFUL. The uSD card is ceramic and can be damaged easily. Insert it gently and press it in until it clicks.**
5. Resetting your TransLogger.
On occasion, you may need to reset your TransLogger. You may decide to do so if your TransLogger does not beep 3x when a cycle starts, or if the white indicator light does not flash at any point during a cycle.
To reset your TransLogger, disconnect its cable from the rear by pushing up on the locking tab, from underneath. This will power it down.
After a few seconds, reconnect the cable. Your TransLogger should beep 2x and display “Steri Simiple” on its screen, then indicate that the uSD card is present (”SD in”) and correct (”SD OK”).
It will then attempt to connect to WiFi as it normally does at start-up.
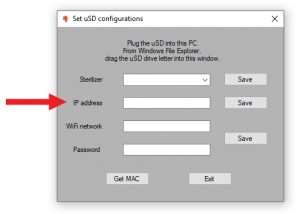
6. Configuring a new uSD to work with your TransLogger.
Your TransLogger will come with a preconfigured uSD card, but on occasion, you may need to use a new uSD or replace missing files. This section explains how to configure a uSD card to work with your TransLogger.
Go to Settings | Micro SD | Set Config Files.
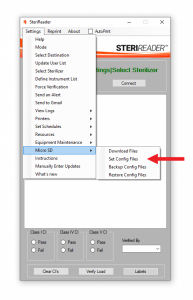
CONFIG FILE. To set your TransLogger to read from a particular sterilizer, select the sterilizer brand from the pull-down box and click Save.
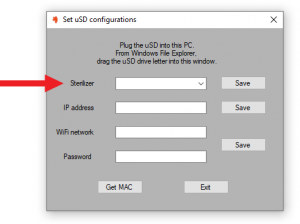
IP ADDRESS FILE. To set your TransLogger’s IP address, enter a reserved IP address (your IT pro will provide this) and click Save. The format of the IP address is “xxx.xxx.xxx.xxx”
WIFI CREDENTIALS. To enable your TransLogger to communicate with SteriReader over WiFi, enter your WiFi Network name and password, then click Save.
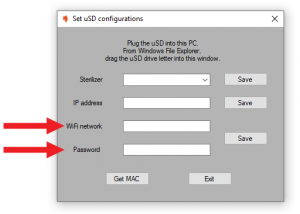
Each time you alter one of these files, it is recommended that you make a backup.
To download files from your uSD card into your Cycle Log database, go to Settings | Micro SD | Download Files.
From Windows File Explorer, drag the drive letter of the uSD into the window. SteriReader will do all the organization automatically and clear the cycle logs from the card.